Friday, 27 June 2014
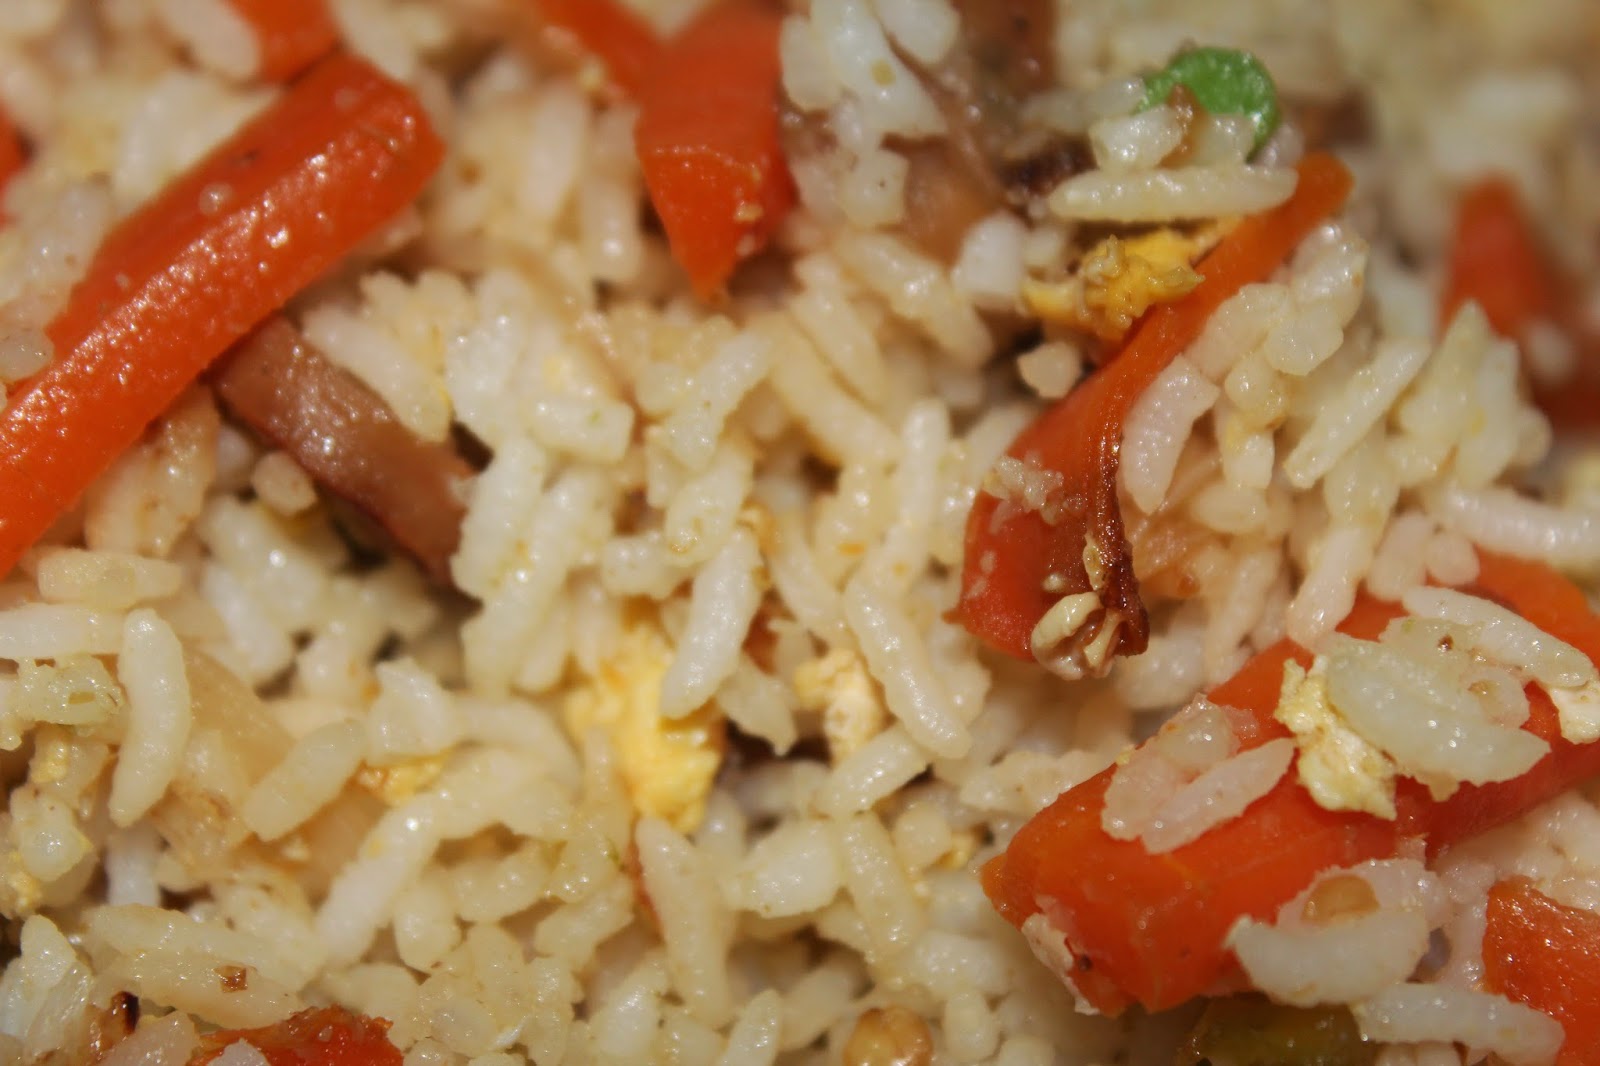
Healthy Mixed Fried Rice Indian Style
Healthy Mixed Fried Rice is combination of veg and non veg. U can convert recipe into Vegetable Fried Rice by just adding Vegetables. In this recipe I am using chicken sausage, eggs and vegetables. Its a very healthy and nutritious recipe. If u prepare this fried rice I am sure your Kids are definitely going to ask for more !!! and this recipe becomes one of there favorite lunch box recipe too...


Ingredients for Mixed Fried Rice :
2 cups cooked rice
2 Eggs
4 sticks chicken sausage (boiled and sliced one)
2 tbsp olive oil
1 chopped Capsicum
3 chopped big Green chillies (Mirchi bajji chillies)
2 chopped carrots
1 & 1/2 tsp Coriander powder
Salt: as per taste
To prepare Mixed Fried Rice :
1. Boil the rice with a little salt and 1 tsp oil,
till each grain is separate and almost cooked. Be careful not to overcook the
rice. Drain excess water and allow it to cool completely. I cooked rice on the
previous day and refrigerated it overnight. This really helps in making a good
fried rice which is not sticky.
2. Heat 2 tbsp of oil in a pan and add onions, green
chillies and saute until translucent.
3. Add all the vegetables, chicken sausage, coriander powder and stir fry for around 3-5 minutes and move to one corner. In the
empty place add eggs and cook till they became scrambled.
4. Know mix everything together add salt and saute for
few more minutes. For this add the cooked rice and mix gently. You can sprinkle
1/2 tsp pepper powder at the end.
5.The Fried Rice is ready to be served hot.
Tips / Notes:
· Feel free to add any vegetables of your choice like
Beans, Mushrooms, Baby Corns and so on.
· U can fallow the same procedure to make Vegetable
Fried Rice by omitting eggs and chicken sausages.
· U can fallow the same procedure to make Egg Fried Rice
by omitting chicken sausage.
Health Benefits :
1. Most vegetables are naturally low in fat and
calories. None have cholesterol. (Sauces or seasonings may add fat, calories,
or cholesterol.)
2. Vegetables are important sources of many nutrients,
including potassium, dietary fiber, folate (folic acid), vitamin A, and vitamin
C.
3. Chickens are low in fat and calories and high in
protein, which makes it ideal for weight maintenance. Not to mention that this
bird is jam-packed full of essential nutrients and vitamins.
4. Eating more eggs is a fantastic way to give
yourself a health boost. Eating whole eggs is vital: the goodness of eggs
is found in the yolk (containing over 90 percent of an egg’s calcium and iron)
and the white (containing almost half the egg’s protein).
So try this recipe and write back to us…We love to
hear from you.
Get this Related Posts Widget
Thursday, 26 June 2014
Ragi murukku or Ragi chakali
Ragi or Finger Millet is a very nutritious grain and has been used in many parts of


Ingredients for Ragi murukku or Ragi chakali :
2 cups Ragi Flour
1 cup Rice Flour
1/2 cup Putani / Rosted gram / Pottukadalai Flour
3 tsp Butter or Ghee
2 tbsp White Till Seeds
1/2 tsp ajwan seeds
1 tsp Red Chilli Powder
2 tsp Salt or as per taste
Oil for deep frying
To prepare Ragi murukku or Ragi chakali :
1. Put 1/4 cup Putani / Rosted gram / Pottukadalai in a mixie and powder it finely.
2. In a vessel put Ragi Flour, Rice flour, Putani / Rosted gram / Pottukadalai Flour, red chilli powder, salt, white till seeds, ajwan seeds and melted butter or ghee. Mix it well. Then add warm water little by little and make a soft dough.
3. Heat oil in a Kadai, Once the oil is hot enough (check by putting a little dough into the oil, it has to come up immediately), take small quantity of dough and put it in the Murukku Press / chakli press with “one stars” plate and squeeze it in circular motion directly to the hot oil. Allow to fry for one or two minutes and then turn it gently, so that it will not break in the oil. Fry till it becomes crispy.
4. Since the colour of the Murukku is dark, you cannot check it by seeding the colour whether it is fried or not. Hence fry it till the sizzling sound of the hot oil reduced to minimum.
5. Repeat the same procedure with the remaining dough.
6. With the same dough U can make Kodubale, Heart shape too.
7. Once the chaklis have cooled completely, store it in an airtight container.
Enjoy this yummy healthy Ragi murukku or Ragi chakali crunchy snack with tea, coffee, or on its own.
So try this recipe and write back to us…We love to hear from you.
Get this Related Posts Widget
Tuesday, 24 June 2014
Tomato Rasam with fresh Instant Rasam Powder
So here is how I make the Tomato Rasam with the Instant fresh Rasam Powder. So learn how to make tomato rasam and make it on a cold or rainy day or when you do not have the time. What ever the case, this rasam is bound to make your lunch or dinner tastier.


Ingredients for Tomato Rasam :
4 Big Tomatoes cut into 8 pieces each
1.5 liter Water
1.5 liter Water
1 stalk Curry leaves
1 stalk Coriander leaves
1 stalk Coriander leaves
1 marble sized ball of jaggery or 1/2 tsp. sugar
Salt to taste
Salt to taste
1/2 tsp Chilli powder
For Instant Rasam Powder
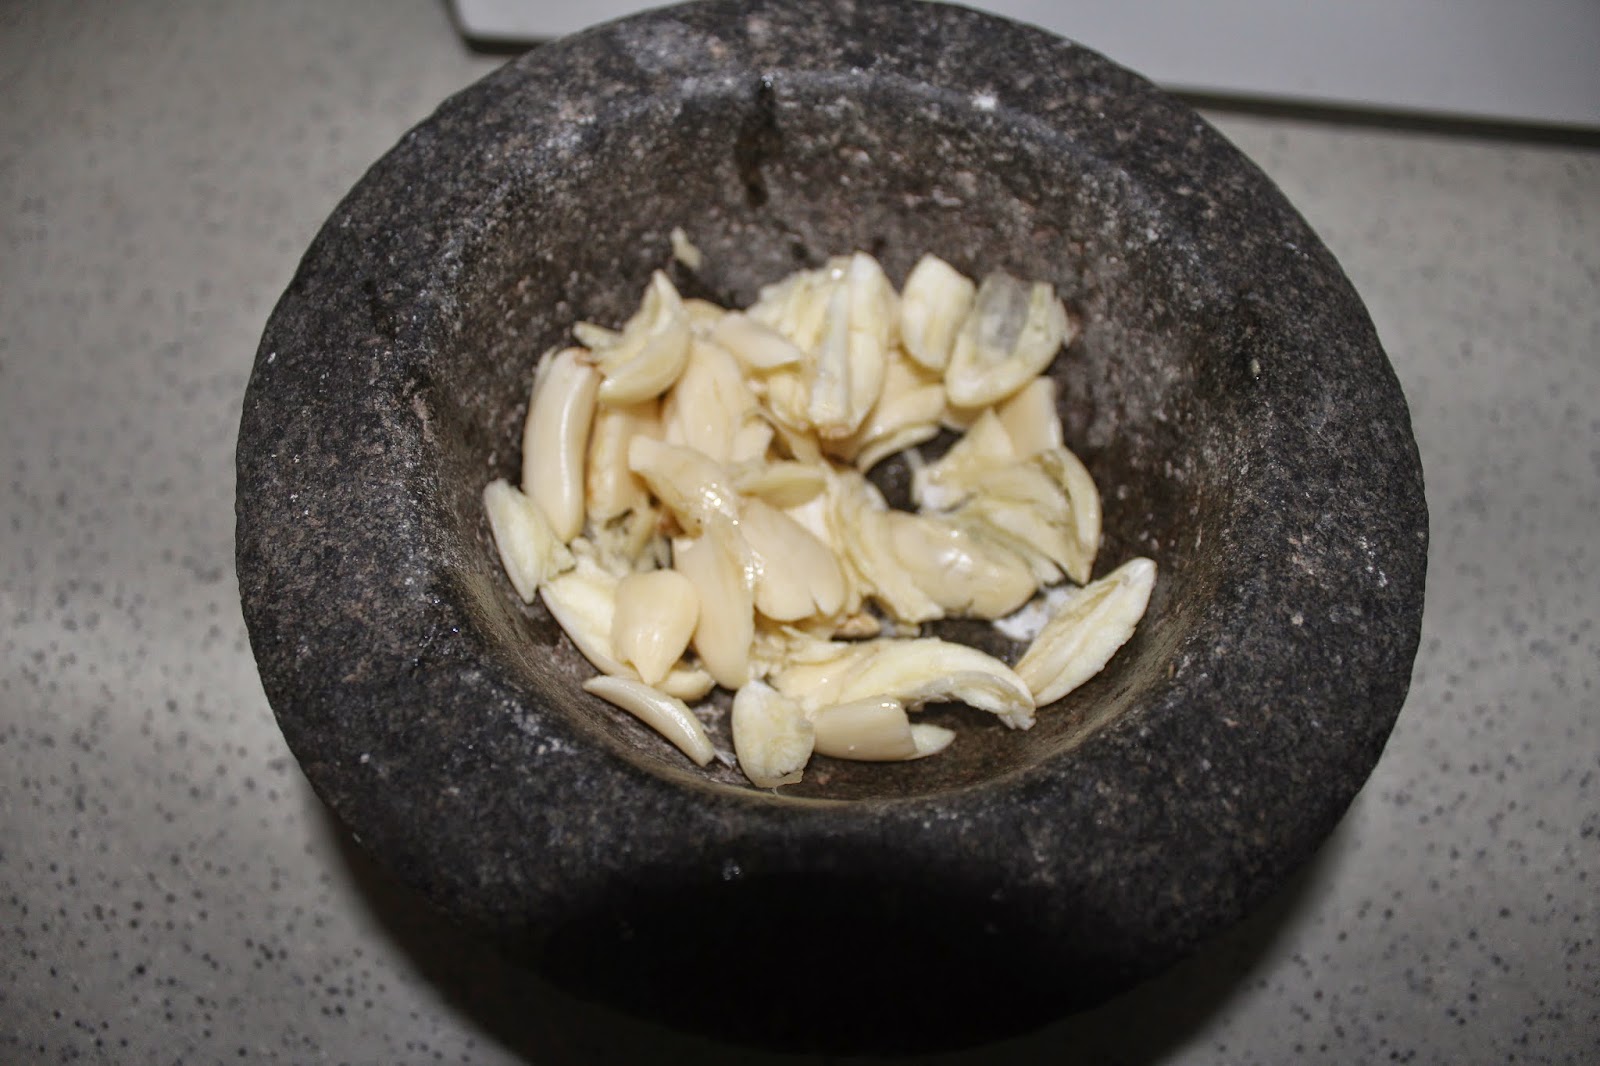
3 cloves Garlic
3 cloves Garlic
1 tsp Peppercorns
1 tsp Cumin seeds
1 tsp Dania / coriander seeds
1 tsp Cumin seeds
1 tsp Dania / coriander seeds
To prepare Tomato Rasam :
1. Boil water with tomatoes, curry leaves and Coriander leaves till tomatoes get soft. Switch off the flame and let it cool. When it is warm enough to handle, mash everything and extract the juice. If the extract is too thick, you can add one more cup of water.
2. Meanwhile, in a hand motor add Peppercorns, Cumin seeds and Dania / coriander seeds and make a coarse powder for this add garlic cloves and by mash it make instant fresh rasam powder.
3. Pour the tomato extract in a thick bottomed vessel. Add turmeric powder, Chilli powder, salt and sugar. Bring to boil. When it starts boiling add the coarsely ground Instant fresh rasam powder. Allow to boil for few seconds. If required season it with mustard. Finally add coriander leaves and remove.
4. Serve hot with plain rice and paapads.
Health Benefits of Tomatoes :
Tomatoes are a rich source of vitamins A and C and folic acid. Tomatoes contain a wide array of beneficial nutrients and antioxidants, including alpha-lipoic acid, lycopene, choline, folic acid, beta-carotene and lutein.
1. Alpha-lipoic acid helps the body to convert glucose into energy.
2. Lycopene is the antioxidant that gives tomatoes their rich red color.
3. Choline is an important nutrient found in tomatoes that helps with sleep, muscle movement, learning and memory.
So try this recipe and write back to us…We love to hear from you.
Get this Related Posts Widget
Daliya Idli with Vegetables / Broken Wheat Idli with Vegetables
Daliya is unrefined wheat and is also a good source of fiber. Daliya Idli with Vegetables / Broken Wheat Idli with Vegetables is a unique dish which is made with Broken Wheat (Daliya) and Vegetables in an Idli’s form. These idli’s taste great when had hot with sambar and coconut chutney. Idli is a traditional breakfast item in every South Indian households. It is a comfort food which is enjoyed by everyone of all ages. Trust me, it is a great food for kids. They can enjoy something new and different and at the same time get all the nutrition from it.


Ingredients for Daliya Idli with Vegetables / Broken Wheat Idli with Vegetables:
1 Cup Daliya (Broken/Cracked Wheat)
1/2 Cup Curd / Plain Yogurt
1 small Onion (Finely Chopped)
1 Tbsp Carrot (Finely Chopped)
1 Tbsp Capsicum (Finely Chopped)
1 Tbsp Peas
1 Tbsp Oil
Salt as per Taste
1/2 to 1 glass Water
To prepare Daliya Idli with Vegetables / Broken Wheat Idli with Vegetables:
Roasting Vegetables
1. Heat Oil on medium flame in a pan. Add Carrot, Green Chillies and saute for a whie then add Peas, Capsicum and Salt. Mix well and let it cook on medium flame for 2 minutes to help soften the vegetables.
2. After 2 minutes, switch off the stove and transfer the vegetables in a bowl.
Preparing Dalia Idli batter
1. Add Daliya to vegetable mix and mix well. Then add Curd and required amount of water and Mix well. Cover the lid and keep it aside for 10 minutes.
2. After 10 min Dalia Idli batter is ready to use. At this stage add some more water if its required and mix well.
Steaming Daliya Idli
1. Grease the idli maker with cooking spray or vegetable oil, pour the batter in each mould.
2. Fill the idli cooker or pressure cooker with 2 to 3 cups of
water and put the idli maker into the cooker and steam it for about 17 to 20
minutes. serve this hot healthy idli with your favorite chutney and
Sambar.
Health Benefits :
1. It is a good source of the daily requirement of fiber and manganese in your food. As it is high in protein and low in fat and calories, it offers you nutrients without adding pounds to your body.
2. It’s an excellent diet for people who want to lose weight.
3. A cup of Daliya has fewer calories, less fat, and more than twice the fiber of brown rice. It helps to keep your digestive tract healthy.
4. The insoluble fiber it contains absorbs water, thus promoting faster elimination of waste.
So try this recipe and write back to us…We love to hear from you.
Get this Related Posts Widget
Monday, 23 June 2014
Pan Fried Fish
Last Sunday, I wanted to buy some fish, so I went to Fair price supermarket to hunt for the fillet. I went to the frozen food section, saw this Fish & Co. frozen Sutchi fillet. Immediately I took a packet. This fillet is skin less, bone less. Now, lets look at my pan fried Sutchi fillet recipe.


Ingredients for Pan Fried Fish :
Sutchi Fillets : 2 no's
2 tsp Olive oil
1/2 tsp Red Chilli Powder
1/4 tsp Coriander Powder
1 pinch Turmeric Powder
Salt: as per taste
Side dishes :
Lettuce 6 leaves
2 no's Mashed potato combined with salt and ghee
1 no grated Carrot
To prepare Pan Fried Fish :
1. After defroze the fillet, wash and dry with kitchen towel.
2. Mix Red Chilli Powder, Coriander Powder, Turmeric Powder and salt and sprinkle it on both sides of the fillet.
3. Heat non stick pan with oil and place the fillets and shallow fry until golden brown on both sides.
4. Pan fried sutchi fillet is ready to serve. Serve it as side dish with rice or serve it with mashed potato, chopped lettuce and grated Carrot as shown in the picture.
Tips / Notes:
- U can use Fish Fillet instead of Sutchi fillet.
- U can Immerge the fish in the egg, then cover both sides with the bread crumb before pan frying. This will give more crunchiness outer layer.
- U can sprinkle salt and Pepper powder Instead of Chilli Powder, Coriander Powder.
So try this recipe and write back to us…We love to hear from you.
Get this Related Posts Widget
Saturday, 21 June 2014
Fried Puffed Rice mixture with Garlic flavour
Searching for a quick, easy and oil-less snacks, here comes Fried Puffed Rice mixture with Garlic flavor - u have to give a trial to this. If you want to eat something with a feeling of fullness, yet no fat, very light and quick-made, this bowl of Fried Puffed Rice mixture with Garlic flavor is best. We used to have this often in the evening with tea. First my MIL used to make it and I don’t remember when I started preparing it myself. In my family it is top one team outing snack too.


Ingredients for Fried Puffed Rice mixture :
500 gm Puffed rice
3 tbsp Oil
1 tsp mustered seeds
1 tsp mustered seeds
10 nos Garlic cloves (crushed)
7 Green chillies (cut in lengthwise)
Few curry leaves
1/4 cup Roasted channa dal / pottukadalai / putani
1/2 cup Peanuts
1/2 tsp Turmeric powder
Salt to taste
To prepare Fried Puffed Rice mixture :
1. Heat oil in a wide pan add mustered seeds, Garlic, green chillies and Curry leaves. Fry them for minutes till garlic gets golden brown color.
2. After that add peanuts and fry for 3 min add turmeric powder and salt.
3. Then add the puffed rice, Roasted channa dal / pottukadalai / putani.
4. Mix it all together and let it sit in the heat for 5 minutes or till Puffed Rice becomes crispy. Store it in air tight container-it will stay for more than a month. Serve it with some hot Chai ( tea).
Tips / Notes:
· U can fry the peanuts separately before adding to this recipe.
· U can serve this by adding onions and tomatoes, but serve it immediately.
· U can add Casio nuts for this recipe too.
So try this recipe and write back to us…We love to hear from you.
Get this Related Posts Widget
Friday, 20 June 2014
Carrot Cup Cake with Wheat flour
If you are looking for a super yummy, low calorie version of a homemade carrot cup cake recipe, then you came to the right place! Healthy, moist, delicious Carrot cup Cake with Wheat flour. The fact that it’s packed full of really good nutrients for you. If you've never eaten a carrot cup cake with wheat flour before or you’re worried about adding wheat flour to a cake recipe, fear not. The cup cake comes out so well plus carrot increase the moistness of the cup cake.


Ingredients for Carrot Cup Cake with Wheat flour :
2 cup grated Carrot
1/4 cup sliced Almonds
1 & 1/2 cup Wheat flour
1 cup sugar
3 Eggs
80 ml Refined Oil
1 tsp Baking soda
To prepare Carrot Cup Cake with Wheat flour :
1. Preheat the oven for 220'c for 10 min.
2. Mean wile add all dry ingredients - Wheat flour, Baking soda and sieve them 2 times.
3. In a bowl add Eggs and Sugar and beat with hand beater for 5 min. Then add oil to it and beat for 2 more min.
4. Put dry ingredients mix, grated Carrot, sliced Almonds to wet ingredients and mix well with cut and fold method.
5. Distribute the batter evenly among the prepared cupcake liners. Bake at 220'c for 10 to 12 minutes, or until a tester inserted into the center of the cupcakes comes out clean. Cool the cupcakes for five minutes in the tin (taking them out too soon can distort the shape!) before removing them with a knife and setting them on a wire rack to cool completely.
6. Delicious Carrot cup cake is ready to serve.
Tips / Notes:
· U can prepare this cake using Mida/plain flour instead of wheat flour.
· Use the Preheat and baking instructions as per oven user guide.
· U can add walnut / pecan nut / chocolate chips for this recipe.
So try this recipe and write back to us…We love to hear from you.
Get this Related Posts Widget
Subscribe to:
Posts (Atom)