Sunday, 31 August 2014
Bottle gourd stir fry
Bottle gourd stir fry is quick and easy side dish and goes well with rice and rasam or sambhar. This stir fries do not need too many ingredients to cook either and Bottle gourd is very healthy food for everyone.


Ingredients for Bottle gourd stir fry:
2 cups Bottle gourd chopped
3 tbsp olive oil
1/2 tsp mustard seeds
1/2 tsp cumin seeds
2 green chillis
1 stem curry leaves
2 med Tomatoes chopped
1/2 tsp Red chilly powder
A pinch turmeric powder
Salt to taste
To prepare Bottle gourd stir fry:
1. Wash and peel the skin of the bottle gourd and chop to bite sized pieces
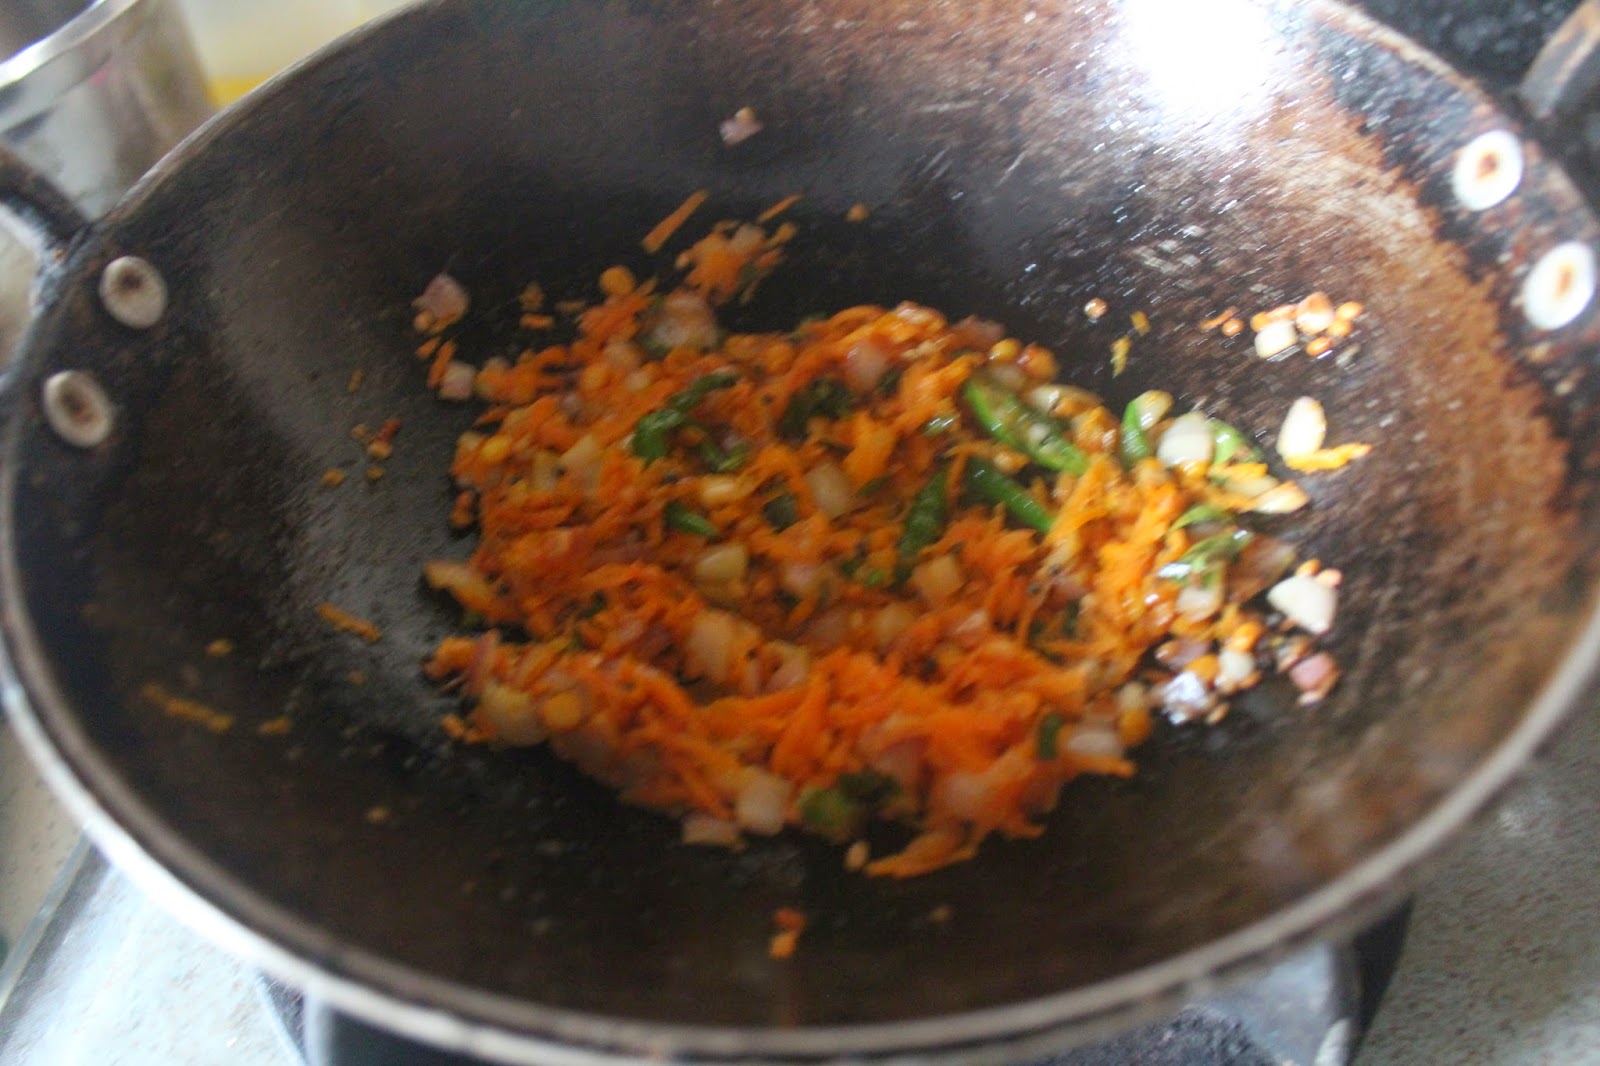
2.Heat oil in a wide heavy bottomed pan, add mustard seeds, cumin seeds, when they begin to crackle add curry leaves and green chilis and fry for a while.
3. Add the bottle guard, sprinkle salt and turmeric.
4. Fry on a medium to high flame for 3 to 5 mins, keep stirring to prevent burning till bottle guard cooked 80%. Add tomatoes, red chilli powder, coriander powder mix well and cook till it is fully cooked.
5. Serve hot with rice and rasam or sambhar. Even u can serve this with white rice and Ghee.
Tips / Notes:
- U can add ginger garlic paste for this stir fry it taste yummy.
- U can add Onion before adding the Bottle gourd this will give light different taste and flavor.
- Adjust spice and salt level as per your requirement.
- I make my stir fries always on the high flame so that I can cook faster. To prevent burning I always use heavy bottomed pan. If you are not using a heavy bottomed pan, cook on a medium flame else your veggie can be burnt.
Health Benefits of Bottle Guard:
- Aids digestion
- Great for weight loss
- Helps treat urinary disorders
- Refreshes you during summers
- Prevents heart disease
- Reduces stress
So try this recipe and write back to us…We love to hear from you.

Get this Related Posts Widget
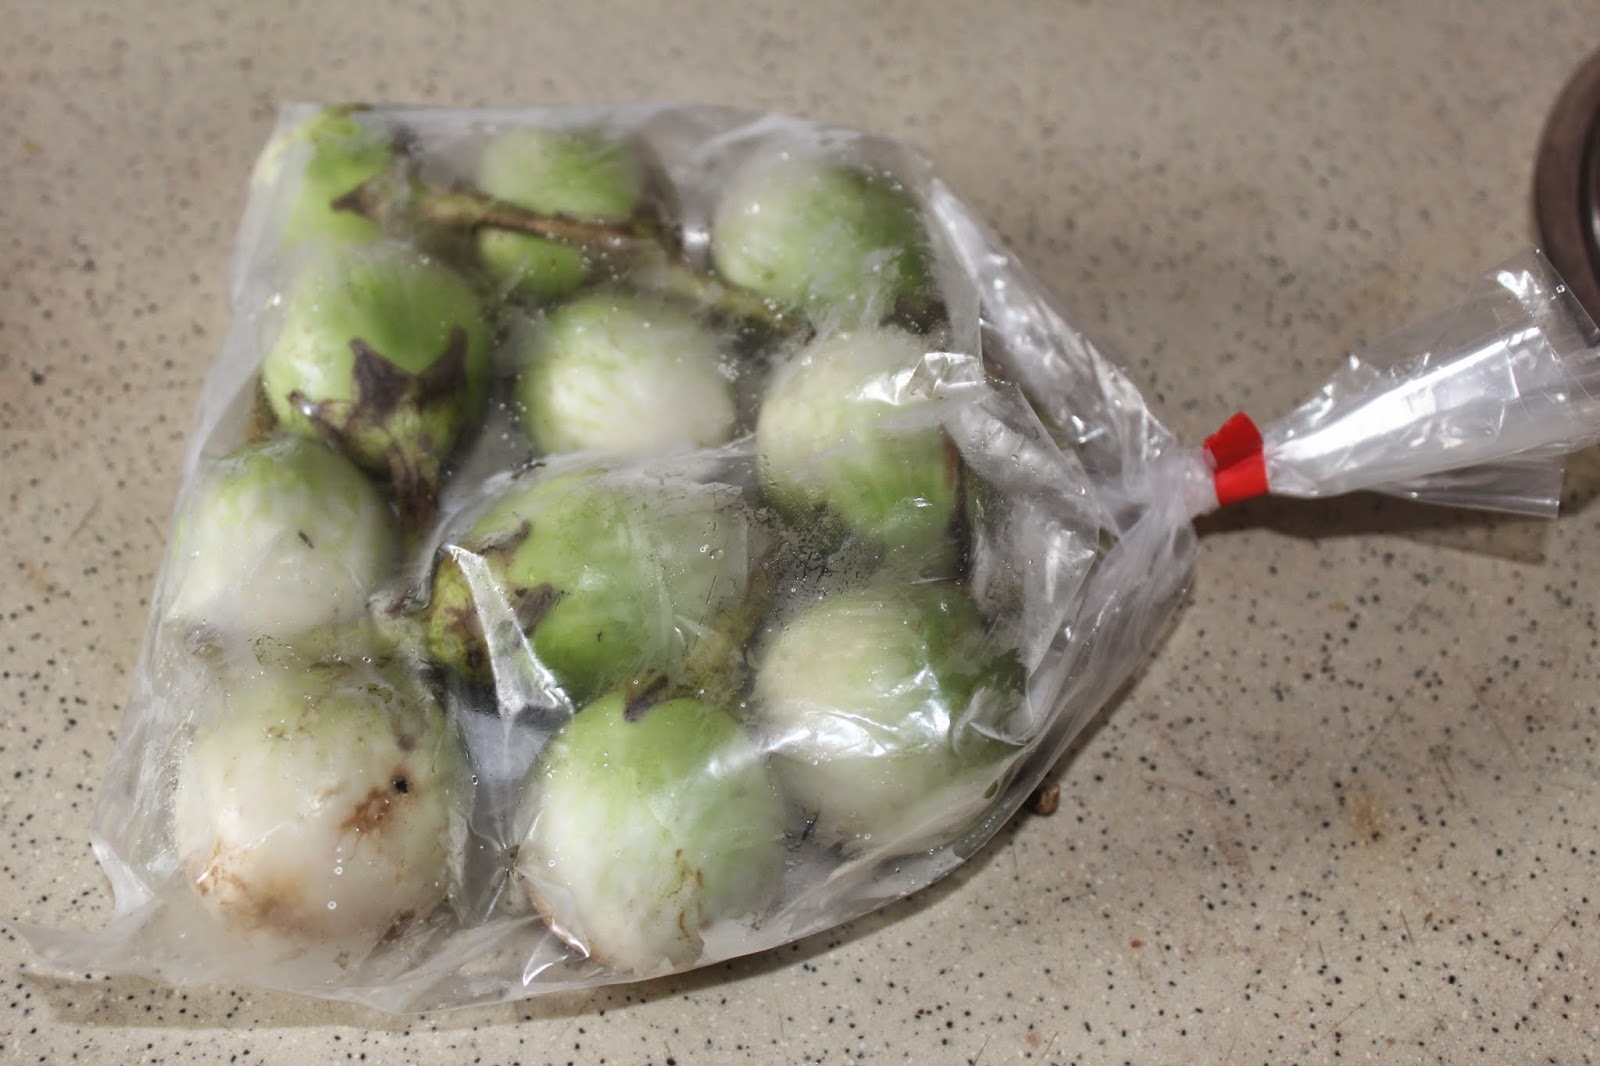
Easy Stuffed Eggplant Curry - Gutti Vankaya Koora
Easy Stuffed Eggplant Curry - Gutti Vankaya Koora. It is usually made with tender, short and round egg plants (brinjal) be it a white or green or purple (your choice of color) the taste is pure fiery heaven. There are many ways of making this curry, but this is my own easy recipe and for this I am adding stuffed potatoes to give a light twist so that even children can enjoy this recipe and its our family favorite recipe too. A part from its wonderful taste, this recipe provides a very healthy meal, as it is loaded with protein packed peanuts. A good reason to make this dish more often in every ones house.


1/4 kg Eggplants : 1/4 kg
4 to 6 Potatoes / Bangala Dumpa
1/4th cup Roasted Penut
1 tsp Red chilli powder
1 & 1/2tsp Coriander powder
1 tsp Ginger Garlic paste
1/4 tsp Turmeric Powder
Salt as per Taste
2 tbsp Olive Oil
To prepare Easy Stuffed Eggplant Curry - Gutti Vankaya Koora:
1. Dry roast the Peanuts and bring it to room temperature. (To avoid this step and fasten the process, dry roast the peanuts as soon as get it from the shop. Then after bringing them to room temperature, store them in airtight container and use whenever its required.)
2. Grind the masala by adding Roasted Peanuts, Red chilli powder, Coriander powder, Ginger Garlic paste, Turmeric Powder and salt by adding less water.
3. Wash the eggplants and Potatoes and make a plus shape slit and stuff them with the ground masala.
4. Heat oil in cooker and add the stuffed eggplants and Potatoes. Cook for 2 min then turn all the eggplants and potatoes to cook other side too.
5. Then add remaining ground masala paste and required amount of water to it. Cover with lid and cook for two wishels.
6. Open the lid, adjust the taste and cook it further for 2 mins.
7. Easy Stuffed Eggplant and Potato Curry_Gutti Vankaya Koora with Bangala Dumpa is ready to serve. Serve it with roti, chapati or with white rice.
Tips / Notes :
- Adjust the spice and salt level as per your requirement.
- U can add Tamarind extract to get tangy taste.
- U can add onion too while grinding masala to get onion spice stuffed brinjal and potato curry.
- U can add fried sesame seeds while grinding masala to get different flavor.
Health Benefits
Eggplants:
1. Eggplant is very low in calories and fats but rich in soluble fiber content.
2. Eggplant is effective to control high blood cholesterol.
3. The peel or skin (deep blue/purple varieties) of aubergine has significant amounts of phenolic flavonoid phyto-chemicals called anthocyanins. Scientific studies have shown that these anti-oxidants have potential health effects against cancer, aging, inflammation, and neurological diseases.
4. This vegetable is an also good source of minerals like manganese, copper, iron and potassium.
Potatoes :
1. Potatoes are nutrient-dense, meaning you receive many nutrients for the amount of calories they have.
2. The fiber is half soluble, half insoluble, so it helps to keep you regular and helps to lower cholesterol. And slowing down digestion helps to keep you full longer
So try this recipe and write back to us…We love to hear from you.
Get this Related Posts Widget
How to Preserve Green Chillies Fresh more than a month .... Kitchen Basics
Sabjiwala In India depending on how often you bought from him or how well you knew him, for less price would hand you some green chillies, kadipatta, cilantro, a small piece of ginger and if you haggled enough, he might throw in a lemon too. Some time we get more cilantro or kadipatta, in addition to a lemon, as a reward of loyalty if buy on a daily basis.
No Sabjiwala in the Indian grocery store or Mustaffa. Just open bins with produce or packed in plastic covers. No mix and match either. I don't shop every week either. So my green chillies need to last between 4 to 5 weeks. I don't like to freeze green chillies as I feel they lose their flavor. I prefer the fresh green chillis.


Ingredients required to Store Green chillies :
Fresh Green Chillies
Paper towel
Plastic container / ziploc cover
To Store Green chillies :
- Snap off the stem and discard it. At this stage discard the brownish or spoiled green chillies too.
- Take a plastic container place paper towel and put green chillies and cover with one more paper towel before closing the lid (to avoid getting more moisture) then refrigerate them. Or wrap them in paper towels, put them in a ziploc cover and refrigerate them.
- Green chillis are ready to stay fresh for more than a month. Mean while in between check for any browning and spoilage to discard but I no longer waste as many chillies as I did earlier.
Tips / Notes:
- Green chillies are known to have bacteria around the stem. This leads to early spoilage. So as soon as u bring home, snap off and discard the stems.
- Make sure to wash green chillies before using them for cooking.
Health Benefits of Green Chillies :
- Green chilies are very rich in Vitamin C, which plays an important role in absorption of other vitamins in the body.
- They are strong anti-oxidants and prevent against free radicals.
- Green chilies are rich in dietary fiber which is important for a healthy digestive system.
- They are rich in Vitamin A, which in turn is very good for your eyes and skin.
- According to some studies, green chilies are responsible of reduction in blood sugar levels and can be a boon to diabetics.
- Some studies suggest that Capsaicin, a chemical found in green chilies helps fight against prostrate cancer.
- Green chilies being good anti-oxidants, are good for skin as they help fight against acne and pimples.
- Capsaicin can be an anti-depressant as it releases endorphins ( hormones for good mood ) into the brain.
- Green chilies help prevent lung cancer according to some researches, but there is no solid evidence of it yet.
- The anti-bacterial property of green chilies help keep our body worm free.
So try this Useful Tips and write back to us…We love to hear from you.
Get this Related Posts Widget
Saturday, 30 August 2014
Adai Rotti
Lentils are good for so many parts of your life: your body, your blood, your pocketbook, your taste buds, and even the environment. Most recipes with lentils are gluten-free and sugar-free. So here comes the recipe using lentils Adai Rotti.

Ingredients to prepare Adai Rotti:
2cups Rice flour
1/4th cup Curry leaves and coriander leaves finely chopped
1/2tsp cumin seeds
1/4th cup grated coconut
1/4 cup finely chopped onions
1/4 tsp hing
Salt as per taste
To grind
1 cup Channa Dal
1cup Tuar Dal
1/2 cup moong Dal
Green chilli 3
To prepare Adai Rotti:
1. Soak lentils/Dal's for 1 to 2 hrs and grind them with green chillies using very little water. Let the mixture be coarse, do not grind it like dosa batter.
2. Take a bowl pour dal paste. Add rice flour, curry leaves, coriander leaves, cumin seeds, grated coconut, onions, hing ad salt and mix well. Prepare rotti dove by adding required amount of water.
3. Place a Tawa or non stick pan on the medium flame, Greece the pan with ghee or oil. Once the pan is hot place the rotti bater on the centre and pat it into 1/2" thick circle. Roast rotti on both sides till is red. Adai Rotti is ready to serve. Serve with curry leaf chutney and home made ghee.
Tips / Notes :
- Prepare only as many rottis as you want. You can refrigerate the dough and use whenever you want.
- U can add mint paste to this rotti bater to make Mint Adai Rotti.
Health Benefits of Lentils:
1. Low cost
2. High Protein
3. High Nutrition
4. Low in Fat and Sodium
5. Most Alkaline of all Protein Sources
6. Easy to Digest and Cook
7. High in Cholesterol-Lowering Fiber (both soluble and insoluble)
So try this recipe and write back to us…We love to hear from you.
Get this Related Posts Widget
Undrallu_Gundugole_Undrallu Payasam_Pala Undrallu
I prepare this Gundugole payasam today for Ganesh Chaturthi, but one can make this on any festival. I learnt this recipe from my MIL during last year Ganesh Chaturthi festival. The process of making those tiny wheet balls is bit tedious but it is worth the effort. This is our family traditional naivedyam for Lord Ganesha on Ganesh Chaturthi. But u can prepare any day this naivedyam to Lord Ganesha on coming 11 days.


1cup wheat flour
1cup Channa dal
1cup Gud / jaggery
1cup Milk
Water to boil Gundugole and Channa Dal
2 to 3 pinch salt
To prepare Gundugole payasam:
1. First make smooth consistency or chapati consistency dove using Wheat flour, salt and water.
2. Take an empty plate and apply oil on it.
3.Take some dough in your hand, and using your fingers make small balls as shown in picture (the smaller the balls, the better the taste. it all depends on your patience). If the dough keeps sticking to you hand, smear little oil to your fingers to continue making the balls. This is the most time consuming process but the end product makes you forget all the pain you have taken while making it.
4. After you finish making all the balls, transwer it to a container add water to it and place in pressure cooker. In another container add Channa dal and water place this too in pressure cooker and cover it with lid. Cook them for two wishals.
5. Once the pressure drops open the cooker. Place a vessel on stove and pore the cooked Gundugole and Channa dal with water. To this add Gud / Jaggery, once the water starts boil add boiled milk and cook for 2 min and switch off the stove. Or when ever u are serving add boiled milk and serve.
6. Taste it at this point of time and adjust the thickness and sweetness of payasam by adding more milk or Gud / Jaggery to suit your taste buds. Do not boil for long as the mixture might curdle up sometimes.
Tips / Notes :
- Jaggery can be replaced with sugar in this recipe.
- If you do not have time to make those tiny wheat balls, u can prepare them one day before and sun dry it and store it in a box. When ever u are preparing this recipe u can use this dried Gundogole to fasten your cooking process on festive days.
- If you do not have time to make those tiny wheat balls, you can use a sev maker(slightly big holes) to press them into long cylinders. You do not need to steam them, you can press them directly into the milk-water mixture and boil it until they float and then add jaggery and boil for some time.
Health Benefits of Wheat:
1. Controls Obesity (especially in women)
2. Improves body metabolism
3. Prevents Type 2 Diabetes
4. Reduces Chronic Inflammation
5. Prevents Gallstones
So try this recipe and write back to us…We love to hear from you.
Get this Related Posts Widget
Saturday, 23 August 2014
Mentya Dose / Fenugreek Dosa
A Mentya / Fenugreek seed has lot of medicinal values. They improve digestion, prevent constipation, gastritis, reduce cholesterol and blood sugar levels. In India Fenugreek seeds are also traditionally used to enhance milk production in lactating mothers. As the name suggests, Mentya / Fenugreek seeds are the star ingredients of this Mentya Dose / Fenugreek Dosa. Easy to prepare and healthy to eat.


Ingredients for Mentya Dose / Fenugreek Dosa :
2 cups Rice
1/4 cup Mentya/ Fenugreek seeds
Salt or as per taste
Oil for making Dosa
To prepare Mentya Dose / Fenugreek Dosa :
1. Wash and Soak both Mentya / Fenugreek Seeds and Rice separately for min 4 hrs.
2. Now grind only Mentya / Fenugreek Seeds with water in a grinder or mixer for about 5-10mins. Batter will become fluffy and little smooth. Then add the rice with the required quantity of water. Grind both the ingredients together to get a smooth batter. Ferment this batter for overnight.
3. In the morning, take fermented batter, add salt and water if required and mix well using a laddle.
4. Heat a tawa and spread one ladle-full of batter into a dosa. Spread it thicker to get soft dosa, it's entirely up to you. Drizzle with some oil cover it and cook. Turn the dosa and cook without covering.
5. Super soft and healthy Mentya Dose / Fenugreek Dosa is ready. Serve hot with ghee and chutney or chutney pudi or sambar.
Tips / Notes:
· In the morning , to the fermented batter, you can add jaggery powder and make sweet Mentya Dose / Fenugreek Dosa.
· This dosa would be super soft because of extra quantity fenugreek seeds. In case for some reasons, your dosas are sticky, you are having problem making them or taking off from tawa , don't panic, add some rice flour to the batter and mix well.
· u can add chopped veggies to formented batter and can prepare Vegitable Mentya Dose / Fenugreek Dosa.
Health Benefits :
Increase breast milk production
Induce and ease child birth
Ease women’s health problems
Reduce cholesterol & Control diabetes
Cure acid reflux or heartburn
Lose weight by suppressing appetite
Beauty product
Fenugreek can be an excellent ingredient for your home-made beauty product. Fenugreek can be used in face packs to help prevent blackheads, pimples, wrinkles, etc. Washing your face with water boiled with fenugreek seeds or applying a paste of fresh fenugreek leaves for twenty minutes on your face can work wonders for your skin.
Solution to hair problems
Using fenugreek as a part of your diet or as a paste to directly apply on your hair makes your hair shiny and Black. Massaging your head everyday with boiled fenugreek seeds soaked overnight in coconut oil can be an excellent remedy for thinning of hair and hair fall.
So try this recipe and write back to us…We love to hear from you.
Get this Related Posts Widget
Friday, 22 August 2014
Sabudana / Sago Upma
There are a variety of dishes made from Sabudana / Sago like the Sabudana payasa, Sabudana Khichdi, Sabudana vade, Sabudana Upma and many more. Sabudana is full of starch or carbohydrates and is great for a quick boost of energy, and hence often served in India for breaking fasts during religious festivals. So here comes the general recipe of Sabudana / Sago Upma.


Ingredients for Sabudana / Sago Upma :
1 cup Sabudana / Sago, soaked overnight
2 tbsp oil
1/2 tsp mustard
1/2 tsp cumin seeds
1 tsp split urad dal
1 tsp channa dal
1 small onion finely chopped
3 green chillies slit
curry leaves
1/2 tsp turmeric powder
1 tbsp lemon juice
salt to taste
To prepare Sabudana / Sago Upma :
- Soak the Sabudana / Sago overnight or 3 hr before u cook.
- Heat the oil in a pan over medium heat. Add mustard seeds, cumin seeds once mustard seeds start splutter add the urad dal and channa dal. When the dals turn brown add the onions, curry leaves and slit green chillies. Saute adding a little bit of salt and the turmeric powder until the onions turn soft and translucent. Add grated carrot and saute for 2 min.
- Add the completely drained Sabudana / Sago to this mixture and saute until the Sabudana / Sago pearls turn translucent and are cooked completely.
- Sprinkle the lemon juice and cook until the juice is completely absorbed. Check for seasoning.
Tips / Notes:
- U can add favorite vegetables to make Vegetables Sabudana / Sago Upma.
- U can add fried peanut for this recipe.
- Adjust the green chillies and salt quantity as per your requirement.
- To prepare Sabudana / Sago Tomato Upma, add 2 chopped tomatoes and saute until soft and all the moisture from the tomatoes is cooked out when the onions turn soft and translucent.
- U can prepare the same recipe without using Onion for fasting recipe.
Health Benefits of Sabudana / Sago :
- Sabudana / Sago is extremely low in fat but also low in protein. As it's just starch, other than the carbohydrates, nutrition-wise, sabudana / Sago does not contain any minerals or vitamins and has very low amounts of calcium, iron, and fiber. However, you can make up for this by using other ingredients with it, such as milk for making sabudana / sago kheer/payasam/a thin porridge or vegetables and peanuts for making sabudana khichdi.
- Sabudana / Sago powder can be used as a thickening agent in gravy dishes, and sago flour can be used to make flat-breads. Sabudana / Sago can be used while preparing vadas and can prepare pappadums using Sabudana / Sago
- Sabudana / Sago is full of starch or carbohydrates and is great for a quick boost of energy, and hence often served in India for breaking fasts during religious festivals.
- Boiled Sabudana / Sago porridge is also great when you're sick because it gives you quick energy and is easy to digest. According to Indian medicine, sago and rice have a cooling effect on the system, hence Sabudana / Sago thin porridge is given if you have excess bile (caused by excess body heat).
So try this recipe and write back to us…We love to hear from you.
Get this Related Posts Widget
Home made Lemon Pickle (Nimbu ka Achar) .... Kitchen Basics
I have started making pickles after watching Maaoori vanta program in maa TV few years back. Because most of the time MIL and mom’s pickle get finish off soon and also really hated the store bought one. Before that, I thought it is difficult for me to proceed because of its lengthy process. Thanks to maa TV for telecasting such a wonderful recipes with easy steps. I noted down the recipe when the program telecast-ed and start to do by my own by adjusting the spice and salt level. When I distributed these pickles to my friends they admire the taste and started to ask recipes. For all my pickle lovers, here comes the recipe.


15 to 20 no’s Lemons (medium size)
½ cup Salt (approx. 5 to 6 table spoons)
½ cup Red chilli powder
½ cup Oil (til or ground nut oil would be good)
½ tbsp. Turmeric Powder
1 tbsp. Methi powder(fenugreek)
½ tsp Hing (asafoetida)
4 to 5 no’s Red
1 tbsp. Mustard seeds
To prepare Lemon Pickle (Nimbu ka Achar):
1. Wash the lemon, pat and dry them nicely using a kitchen towel. Cut lemons into medium size pieces.
2. Remove the seeds using the knife edge otherwise the pickle tastes bitter.
3. In a mixing bowl add Lemon pieces, ½ cup salt and ½ tsp Turmeric Powder mix well so that each lemon slice gets coated with salt and turmeric. Keep it in a dry bottle or any dry glass Jar for 3 days. (shake the jar well every day)
2. Take a frying pan. Heat 1\2 cup of oil. Add Mustard seeds, Red chillies and Hing (asafoetida) to it. Let the Mustard seeds splutter. Remove it from the flame and let it cool completely.
3. Take large bowl, put the marinated lemon pieces into it. Add ½ cup red chilli powder, 1 table spoon Methi powder (fenugreek) to it and Mix well.
4. Add the cooled thadka to the Lemon Pickle (Nimbu ka Achar) and mix well. Store it in air tight jar. Lemon Pickle (Nimbu ka Achar) in Andhra style is ready. Serve it with Curd rice.
5. This can stay more than 4 months if u keep it outside. You can store this in refrigerator too for longer life (more than 6 months).
Tips / Notes :
- U can adjust the Salt and chilli powder levels as per your requirement.
- U can add Green chillies instead of red chilli powder.
- Make sure that the Mixing bowl and spoon you are using should be dry.
- Always use dry Bottle to store the pickle.
- Whenever you are taking the pickle for serving just mix it from top to bottom and then take the required quantity of pickle by doing this more oil will not come to the spoon.
Health Benefits of Lemon:
The health benefits of lemon include its use as a treatment of throat infections, indigestion, constipation, dental problems, and fever, internal bleeding, rheumatism, burns, obesity, respiratory disorders, cholera and high blood pressure, while it also benefits hair and skin care,. Known for its therapeutic property since generations, lemon helps to strengthen your immune system, cleanse your stomach, and it is considered a blood purifier.
Lemon juice, especially, has several health benefits associated with it. It is well known as a useful treatment for kidney stones, reducing strokes and lowering body temperature. As a refreshing drink, lemonade helps you to stay calm and cool.
So try this recipe and write back to us…We love to hear from you.
Get this Related Posts Widget
Subscribe to:
Posts (Atom)