Friday, 22 August 2014
Home made Lemon Pickle (Nimbu ka Achar) .... Kitchen Basics
I have started making pickles after watching Maaoori vanta program in maa TV few years back. Because most of the time MIL and mom’s pickle get finish off soon and also really hated the store bought one. Before that, I thought it is difficult for me to proceed because of its lengthy process. Thanks to maa TV for telecasting such a wonderful recipes with easy steps. I noted down the recipe when the program telecast-ed and start to do by my own by adjusting the spice and salt level. When I distributed these pickles to my friends they admire the taste and started to ask recipes. For all my pickle lovers, here comes the recipe.


15 to 20 no’s Lemons (medium size)
½ cup Salt (approx. 5 to 6 table spoons)
½ cup Red chilli powder
½ cup Oil (til or ground nut oil would be good)
½ tbsp. Turmeric Powder
1 tbsp. Methi powder(fenugreek)
½ tsp Hing (asafoetida)
4 to 5 no’s Red
1 tbsp. Mustard seeds
To prepare Lemon Pickle (Nimbu ka Achar):
1. Wash the lemon, pat and dry them nicely using a kitchen towel. Cut lemons into medium size pieces.
2. Remove the seeds using the knife edge otherwise the pickle tastes bitter.
3. In a mixing bowl add Lemon pieces, ½ cup salt and ½ tsp Turmeric Powder mix well so that each lemon slice gets coated with salt and turmeric. Keep it in a dry bottle or any dry glass Jar for 3 days. (shake the jar well every day)
2. Take a frying pan. Heat 1\2 cup of oil. Add Mustard seeds, Red chillies and Hing (asafoetida) to it. Let the Mustard seeds splutter. Remove it from the flame and let it cool completely.
3. Take large bowl, put the marinated lemon pieces into it. Add ½ cup red chilli powder, 1 table spoon Methi powder (fenugreek) to it and Mix well.
4. Add the cooled thadka to the Lemon Pickle (Nimbu ka Achar) and mix well. Store it in air tight jar. Lemon Pickle (Nimbu ka Achar) in Andhra style is ready. Serve it with Curd rice.
5. This can stay more than 4 months if u keep it outside. You can store this in refrigerator too for longer life (more than 6 months).
Tips / Notes :
- U can adjust the Salt and chilli powder levels as per your requirement.
- U can add Green chillies instead of red chilli powder.
- Make sure that the Mixing bowl and spoon you are using should be dry.
- Always use dry Bottle to store the pickle.
- Whenever you are taking the pickle for serving just mix it from top to bottom and then take the required quantity of pickle by doing this more oil will not come to the spoon.
Health Benefits of Lemon:
The health benefits of lemon include its use as a treatment of throat infections, indigestion, constipation, dental problems, and fever, internal bleeding, rheumatism, burns, obesity, respiratory disorders, cholera and high blood pressure, while it also benefits hair and skin care,. Known for its therapeutic property since generations, lemon helps to strengthen your immune system, cleanse your stomach, and it is considered a blood purifier.
Lemon juice, especially, has several health benefits associated with it. It is well known as a useful treatment for kidney stones, reducing strokes and lowering body temperature. As a refreshing drink, lemonade helps you to stay calm and cool.
So try this recipe and write back to us…We love to hear from you.

Get this Related Posts Widget


Tuesday, 19 August 2014
Home made Candy / Popsicle with No Sugar 100% Fruits
Summer is almost here, the weather is warm. Bring on the Popsicle! And cool off from the afternoon heat. We like to make our own because not only does it give us something to do, but we get to choose what goes in them. Use whatever fruit you're heart desires. A perfect summer treat! No processed corn syrup, gobs of sugar or food coloring here. These are so simple, cute, delicious and all natural that I can feel great about giving these to my kids.


Ingredients for Popsicle with No Sugar 100% Fruits :
1/2 cup watermelon, deseeded
1/2 cup Cantaloupe
1/2 cup Honeydew
To prepare Popsicle with No Sugar 100% Fruits :
1. Juice the watermelon, Cantaloupe and Honeydew s in separate batches. Keep them separated in clean containers.
2. Starting with whichever flavor floats your boat, fill your Popsicle molds 1/3 full. Place them in the freezer until fully frozen. Don’t rush this step – allow the first layer to freeze completely prior to trying to pour in your second flavor…if u do this step u get clear color layers in your Popsicle. But - 1/3 molds I filled up with Cantaloupe juice, then watermelon and remaining with Honey dew without freezing individual fruit.
3. Close the mold and Keep it in the freezer and allow to fully freeze or keep it overnight.
4.To unmold, run warm water over the molds just until Popsicle release from sides, 5 to 15 seconds. Popsicle's are ready to serve.
So try this recipe and write back to us…We love to hear from you.
Get this Related Posts Widget
Saturday, 9 August 2014
Versatile Homemade Garam Masala Powder .... Kitchen Basics
The Garam Masala Powder traditionally is a mixture of cinnamon, cardamom, Shahjeera, coriander seeds, cloves, star anise and nutmeg. Homemade masala is simply all the ingredients listed above, toasted in a pan on stove top and then finely blended to a powder. Some benefits of Garam Masala is that it slows down the aging process and helps promote weight loss. Yes, that’s right, eating foods with Garam Masala can actually help shed some pounds. This is my version of Garam Masal Powder, trust me adding this to Biryani, Biranji, Vegetable Bath, Veg and Non-veg curries gives fabulous aroma and taste too.


Ingredients for Versatile Homemade Garam Masala Powder:
3 table spoons Coriander seeds
2 table spoons Shahjeera
2 table spoons Cloves
2 table spoons Cinnamon sticks
25 to 30 small Green cardamoms
1 ½ Star Anise
To prepare Versatile Homemade Garam Masala Powder:
1. Heat a heavy skillet on a medium flame and gently roast all the above ingredients dry (without oil) till they turn a few shades darker. Stir occasionally. Do not be tempted to speed up the process by turning up the heat as the spices will burn on the outside and remain raw on the inside.
2. When the spices are roasted turn of the flame and allow them to cool. Grind them all together, to a fine powder in a clean, dry mixer grinder or coffee grinder.
3. Place this powder in an airtight container, and store in a cool, dry place it will stay good for 3-4 months.
4. You can use this Garam Masala Powder for Veg as well as Non veg curries too...........
Tips / Notes :
- To take care of mixer grinder blade, break the cinnamon and cardamom in small fragments and then grind.
- Transfer the powdert in a flat dish for 1/2 hr. So heat generated while grinding is released, if you will put it in an air tight jar immediately it will spoil.
Health Benefits :
Cinnamon
An anti-microbial as well as anti-inflammatory. It’s high in calcium and fiber and helps control blood sugar by helping to increase insulin production while lowering blood sugar levels.
Coriander
An ingredient used to control blood sugar levels and to lower cholesterol. It helps stimulate digestion.
Cardamom
An anti-bacterial, anti-fungal and anti-carcinogenic. It helps to flush out toxins from the body, relieves heart burn, reduces the formation of blood clots, lowers blood pressure, increases blood circulation, relieves gas, and soothes upset stomachs.
Cloves
Contain a purifying property that helps support the immune system. Relieves tooth aches, boosts the metabolism, removes toxins from the blood stream, helps prevent the formation of blood clots and regulates blood sugar levels. You might not guess, but cloves are higher than any other food in antioxidant content. They provide an excellent source of calcium, omega 3, and vitamin K.
So try this Spice powder and write back to us…We love to hear from you.
Get this Related Posts Widget
Wednesday, 6 August 2014
Potato Masala
Potato Masala is an easiest and best vegetarian accompaniment for Pooris. Though it is South Indian dish, it is famous all over India. It is quick and easy to prepare. This silky texture Potato Masala can be eaten with poories, chapatis, dosas and Idlies. And also can be used as a filling for healthy and nutritious sandwiches. We can also use this as a spread for Masala Dosa, if the Potato Masala is prepared bit thick in consistency!


Ingredients for Potato Masala:
3 no- Medium size potatoes
2 no – Medium size Onion (finely chopped)
2 no – Green chilly (finely chopped)
¼ tsp – Turmeric powder
2 tsp - Roasted gram flour Mixed in water
1 tbsp – Chopped Coriander leaves
1/4 Cup frozen peace
Salt as needed
1/4 Cup frozen peace
Salt as needed
Tempering:
1 tsp – Mustard seeds
1 tsp – Cumin seeds
1 pinch – Asafoetida(hing)
2 tbsp – Oil
To prepare Potato Masala :
1. Pressure cook potatoes with water until soft. Allow it to cool, then peel the skin and cut into small sized cubes or mash them coarsely.
2. Heat oil in a wok, add mustard seeds, Cumin seeds and allow it to crackle then add asafetida. Add onion and fry till the Onion becomes translucent. Now add the smashed potatoes, turmeric powder, green piece and mix well. Add required amount of salt and water, give a quick stir and bring it to boil.
3. In a separate bowl, mix Roasted gram flour with ¼ - ½ cup of water make sure no lumps are present. Pour this into the Potato mixture and allow it to cook for 5 minutes in reduced flame. Check for the consistency. It should not be very dry or watery.
4. Potato masala is ready to serve. Garnish with Coriander leaves and serve hot with Pooris, Idlies or Dosas.
Tips / Notes :
- U can add basan flour instead of mix Roasted gram flour to thicken the potato masala.
- U can add ginger garlic paste for this recipe for different flavor.
- U can add red chilli powder instead of green chillies.
So try this recipe and write back to us…We love to hear from you.
Get this Related Posts Widget
Tuesday, 5 August 2014
Festival Cooking Series for VaralakshmiViratham and Ganesha Chaturthi
Festival Cooking Series for VaralakshmiViratham and Ganesha Chaturthi. U can post narratives of celebrations, memories and of course festive recipes.
So do link all your festive recipes here! Looking forward to all the lovely entries from all my blogger and non-blogger friends.


To Participate :
You have to like SavisPassions Facebook page and do add in follower list in SavisPassions blog. This is mandatory. Share about this event tagging 5 friends in your own timeline of FB page.
To Participate :
You have to like SavisPassions Facebook page. This is mandatory. Share about this event tagging 5 friends in your own timeline of FB page.
1. The event runs from 5th Aug - 3rd Sep.
2. Recipes must be linked to this event announcement page. If sending an old entry, it needs to be re-published with the links.
3. Usage of the logo is appreciated as it helps spread the word.
4. You can send in any number of new entries and a maximum of 2 old entries.
5. Non-bloggers can also welcome, send me full recipe with a photograph to this e-mail - savitha.mahendrakar@gmail.com
6. Bloggers can link their recipes using the linky tool. Bloggers who find it difficult or find some problem to link can also send in their recipes to my mail with the following details
Your Name-
Recipe Name-
Recipe Details-
Pic of the Dish -
Get this Related Posts Widget
Monday, 4 August 2014
Palak Pappu / Spinach Dal
Palak / spinach green leafy vegetable is known for high Calcium, Magnesium, Potassium and its Vitamin Content. Definitely a good choice to add to your menu. And it is very good for health... and it is again a easy to cook dish... Lots of dishes are prepared with palak such as Palak paneer, Palak in Moong dal, Palak Sabji, Palak Stir fry etc. I normaly serve this with chapathi and it tastes awesome. It can even be served with just plain rice with Ghee.


Ingredients for Palak Pappu / Spinach Dal :
1 bunch of palak
1 cup Toor dal
1 med Onion
1 med Tomato
6 green chillies
1tbs turmeric
Lemon size Tamarind
Salt as per taste
For Tempering :
3 tsp Olive oil
1/2 tsp Mustered seeds
1/2 tsp Cumin seeds
1/2 tsp Mustered seeds
1/2 tsp Cumin seeds
A pinch of Hing /Asafoetida
1 string Curry leaves
2 sliced Red chillies
4 clove garlic sliced
To prepare Palak Pappu / Spinach Dal :
1. Cut the onion, tomato in to medium picese
2. Take a pressure cooker and add chopped Palak, Dal, Onions, Tomatoes, Green Chillies, Turmeric, Tamarind and 2cups of water and pressure cook for 4 vishal. Switch off the flame and allow the pressure to go off. Add required amount of salt to this boiled dal.
3. In a small frying pan add 3 tsp oil, Mustard seeds, Cumin seeds, Hing /Asafoetida, Red chillies and Garlic and saute till it becomes brown. Add this tempering to Dal and cover the lid and cook it for 5 more minutes.
4. Palak Pappu / Spinach Dal is ready to serve. Serve hot with Chapati or plain rice.
Health Benifits :
Lentils are Low in calories and high in nutrition - that anyone can benefit from by incorporating this healthy legume into their diet.
Possible health benefits of spinach are Diabetes management, Cancer prevention,
Asthma prevention, Lowering blood pressure, Bone health, Promotes regularity, Healthy skin and hair
So try this recipe and write back to us…We love to hear from you.
Get this Related Posts Widget
Basic RICE AND DAL ADAI
Basic Rice and Dal Adai is a very popular south Indian breakfast dish served with coconut chutney. Adai is made of lentils and rice. It is usually prepared for breakfast and is filling and healthier than dosa. It is a comfort food which is enjoyed by everyone of all ages. These Adais tasts when had with coconutchutney. So do try this recipe I promise u'r kids are going to love them a lot.....

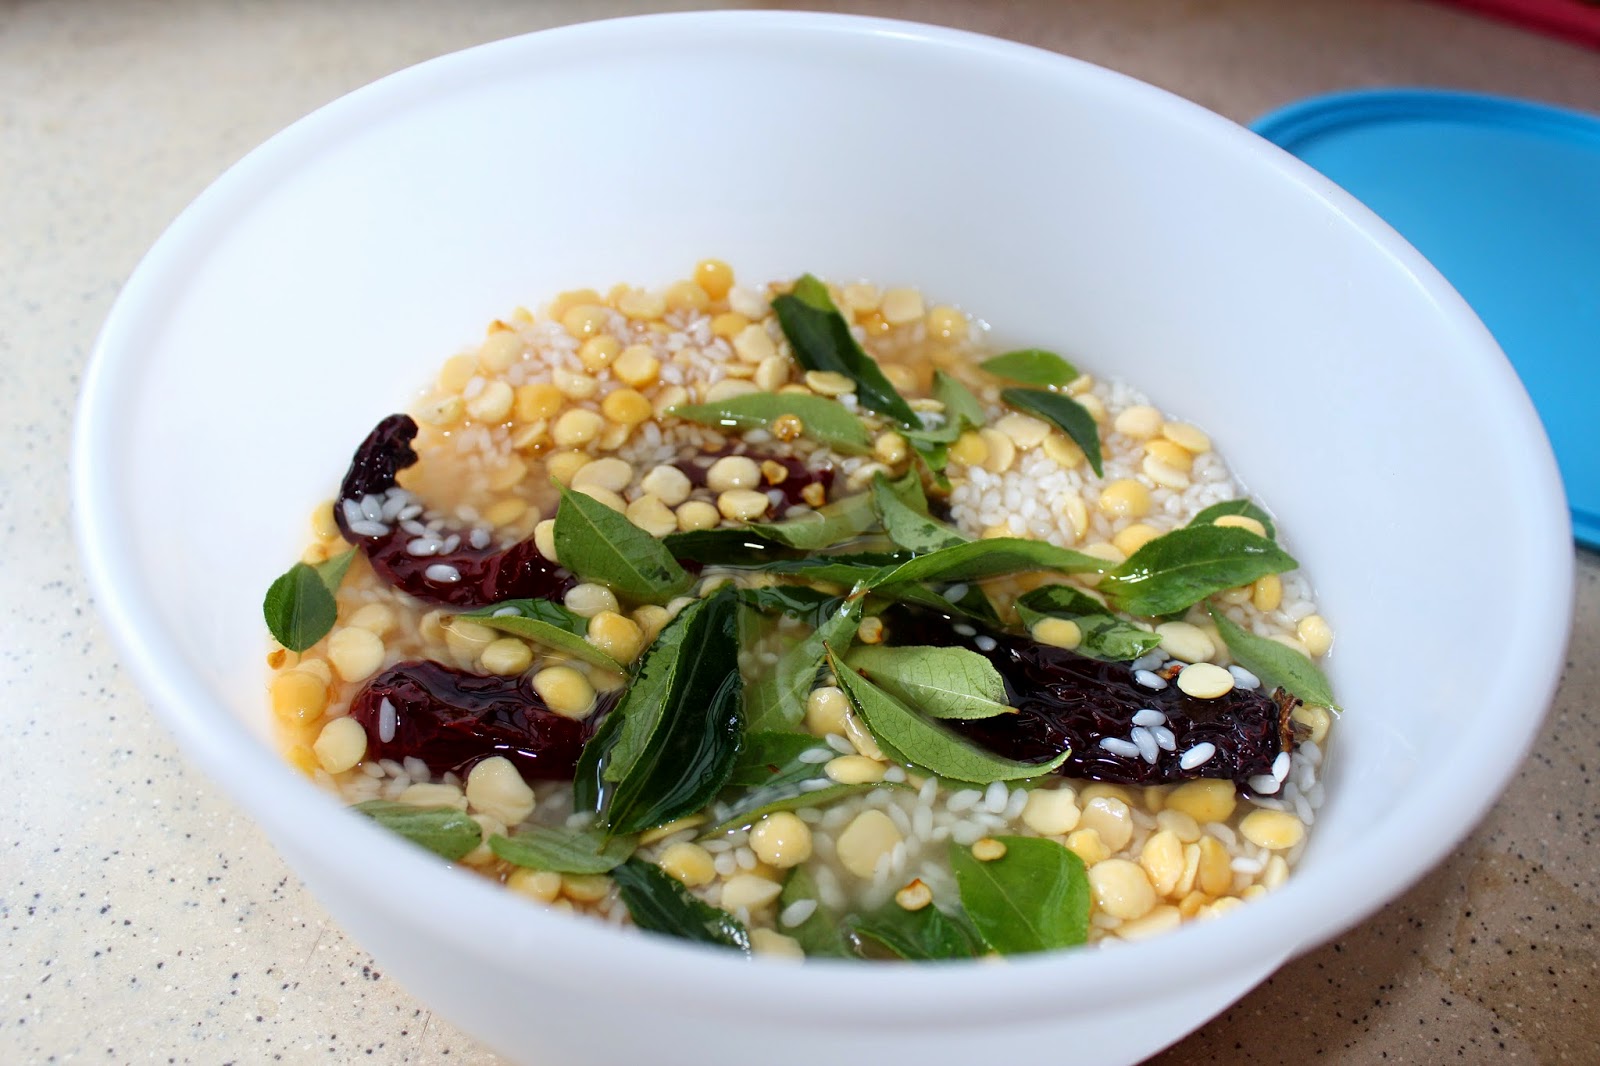


Ingredients for Basic Rice and Dal Adai :
1 cup Rice
1 tbsp Tur Daal
1 tbsp Channa Dal
3 whole Red chillies
2 string Curry leaves
1 pinch Hing / Asafoetida
Salt as per taste
Oil to prepare Adai
To prepare Basic Rice and Dal Adai :
1. Take a bowl add Rice, Tur daal, Channa daal and wash with water.
2. For this add red chilly, curry leaves, salt, hing, add water little more than rice, and soak it over night (or) at least 4 hours, then put it into the blender and make a coarse and thicker batter.
3. Heat Oil in a griddle, Once the oil is hot enough pour the batter on it and spread the batter, (Compare to dosa, Adai is slightly thicker) and make some holes on the Adai and pour the oil, and put the lid on and let it cook for 2 minutes in a slow flame till it is crispy. Turn and cook on the other side with out the lid for 1 more min.
4. Serve this hot ADAI with butter and coconut chutney.
Tips / Notes :
· U can adjust the rice and dal quantities as per your requirement.
· If u want crispy Adai then increase the rice quantity.
· If u want soft Adai then increase the Dals quantity.
Get this Related Posts Widget
Sunday, 27 July 2014
Anda Bhurji with Prawns / Egg stir fry with Prawns
Anda Bhurji with Prawns / Egg stir fry with Prawns - is one of my husband Invention dish. It is very simple and easy to cook. This is one of my daughter favorite dish too. I make this curry on Sunday for breakfast with roti or parathas. It’s easy, quick and on top of all yummy!!! Know in my family it became instant and favorite curries to all and more often I serve it with Chapati and rice. It even goes well with sandwich between two bred slices.


Ingredients for Anda Bhurji with Prawns / Egg stir fry with Prawns:
Egg: 2 whole
250 gms frozen Prawns
3 tsp Olive oil
2 med Onions finely chopped
4 no's Green Chilli finely chopped (remove the seeds if you don't want it to be too spicy)
1 med Tomato finely chopped
1 tsp Red Chilli Powder
1/2 tsp Coriander Powder
1 pinch Turmeric Powder
Salt: as per taste
To prepare Anda Bhurji with Prawns / Egg stir fry with Prawns:
1. Cook the prawns in boiling water for 5 min.
2. In a pan, heat oil, add the onions, curry leaves, green chillies and salt.
3. Sauté till onions becomes translucent. Then add the tomatoes and allow it to cook in medium flame until the tomatoes are nicely cooked and mushy.
4. Add Red Chilli Powder, Coriander Powder, Turmeric Powder and mix well. Allow to cook for 3 min.
5. Then add eggs and Cooked prawns and wait till it starts cooking like an omelette. Now keep stirring vigorously, until u see the eggs crumbling and cook until all the moisture evaporates and u feel a nice aroma coming out.
5. Then add eggs and Cooked prawns and wait till it starts cooking like an omelette. Now keep stirring vigorously, until u see the eggs crumbling and cook until all the moisture evaporates and u feel a nice aroma coming out.
6. This just takes 5 to 10mins. Anda Bhurji with Prawns / Egg stir fry with Prawns are ready to serve. Serve hot with Chapati, Roti , Plain rice or place it between two sandwich bred slices and have it as breakfast.
Tips / Notes:
- By adding Ginger garlic paste u can make it as masala Anda Bhurji with Prawns / Egg stir fry with Prawns
- For this recipe u can also add more optional vegetables like Peas / potaotes / mushrooms / capcicum.
- U can add some left over rice to this mix and make it into an instant Egg Prawns fried rice.
Eating more eggs is a fantastic way to give yourself a health boost. Eating whole eggs is vital: the goodness of eggs is found in the yolk (containing over 90 percent of an egg’s calcium and iron) and the white (containing almost half the egg’s protein). If you’re not eating eggs regularly, here are five reasons why you should.
1. Get your vitamins
2. Boost your weight loss
3. Take in essential minerals
4. Indulge in low-calorie protein
5. Prevent breast cancer
Prawns are great supplier of proteins and low in fat and calories which make them a healthy food. Prawns are low in saturated fat (which is responsible for raising bad cholesterol levels in the body). If you have prawns, you can control the bad cholesterol (LDL) levels and prevent heart diseases like heart attack and blockage.
So try this recipe and write back to us…We love to hear from you.
Get this Related Posts Widget
Subscribe to:
Posts (Atom)